基于以太坊開發的應用(如何寫一個在WEB網頁中調用以太坊智能合約的DAPP)

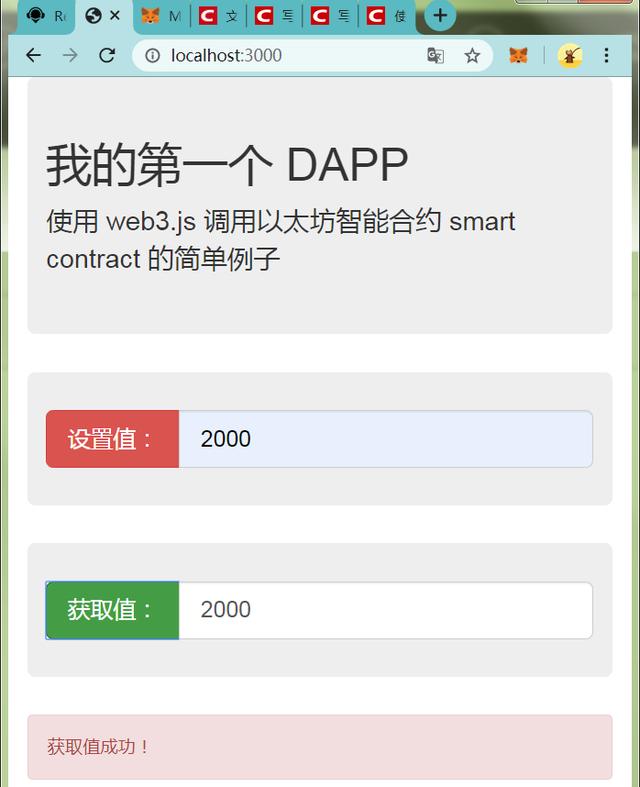
在【使用web3調用智能合約的簡單例子】中,使用的是Nodejs來調用智能合約,Nodejs適合做服務器端的應用。如何在WEB網頁中調用智能合約,其實方法類似,同樣是使用web3.js庫。網頁版例子的運行效果如下圖所示,更加的直觀。
網頁版的例子,同樣的為了簡單起見,仍舊直接使用Remix自帶的Storage.sol合約例子,就是簡單的存儲和獲取一個整數數值。前兩個步驟 【1.編寫智能合約】 和 【2.部署智能合約】 與【使用web3調用智能合約的簡單例子】的前兩個步驟完全一樣,這里主要講述一下后面的兩個步驟 【3. 安裝一個簡易版的WEB服務器】 和 【4. 在網頁中調用智能合約】。
3. 安裝一個簡易版的WEB服務器
使用 lite-server(https://www.npmjs.com/package/lite-server) 一個輕量級的Nodejs實現的WEB服務器,作為開發使用很方便,安裝方式:
npm install lite-server --save-dev
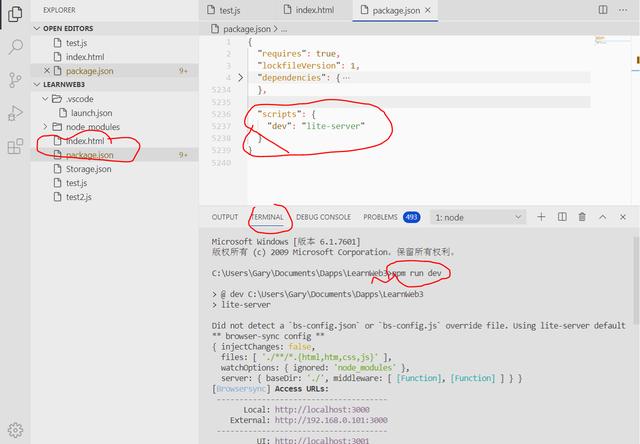
配置:在package.json文件中增加
“scripts”: {“dev”: “lite-server”}
啟動
npm run dev
啟動后就會在瀏覽器中自動打開當前目錄下的 index.html 頁面,我們就在這個頁面中使用 javascript 實現具體的邏輯。
4. 在網頁中調用智能合約
開始使用jQuery開發index.html網頁,主要的代碼是:
if (window.ethereum) { //連接到Metamask web3 = new Web3(ethereum);} else { ///直接連接到Ganache web3 = new Web3(new Web3.providers.HttpProvider("http://127.0.0.1:7545"));}//讀取合約的ABI信息var data = $.ajax({ url: "./Storage.json", async: false }).responseText;//創建合約對象,使用的合約地址是我們剛創建的合約地址var contract = new web3.eth.Contract(JSON.parse(data), '0xc8b522331e8A2369e87Cb4be6bE7C74Be86f1AAB');$("#setValue").click(function () { try { ethereum.enable(); contract.methods.store($("#txtValue").val()).send({ from: '0x51BF497D8B47C5754220be9256F0Cb9E2Cd688B8' }); $("#msg").text("設置值成功!"); } catch (err) { $("#msg").text("設置值失敗:" + err.message); }});$("#getValue").click(function () { contract.methods.retreive().call().then(function (result) { $("#spanValue").val(result); $("#msg").text("獲取值成功!"); });});需要說明的是:
在網頁中使用MetaMask連Ganache時,需要使用注入的ethereum作為提供者。上段代碼中的第1到4行。
為了在網頁中使用MataMask的用戶賬號send事務,必須要調用ethereum.enable先。上段代碼中的第17到18行。
代碼中第10行Storage.json文件中的內容是Storage合約的ABI文件,點擊在Remix編譯面板底部的ABI按鈕可以復制出來然后粘貼到Storage.json文件中。
完整的網頁代碼如下,為了讓頁面長得好看些,使用了Bootstrap,如果不關注可以無視。重點關注上一段代碼。
<!DOCTYPE html><html lang="en"><head> <meta charset="utf-8"> <title>最簡單的DAPP</title> <script src="https://apps.bdimg.com/libs/jquery/2.1.4/jquery.min.js"></script> <script src="./node_modules/web3/dist/web3.min.js"></script> <meta name="viewport" content="width=device-width, initial-scale=1"> <link rel="stylesheet" href="https://cdn.staticfile.org/twitter-bootstrap/3.3.7/css/bootstrap.min.css"> <script src="https://cdn.staticfile.org/twitter-bootstrap/3.3.7/js/bootstrap.min.js"></script></head></head><body> <div class="container"> <div class="jumbotron"> <h1>我的第一個 DAPP</h1> <p>使用 web3.js 調用以太坊智能合約 smart contract 的簡單例子</p> </div> <div class="jumbotron"> <form class="bs-example bs-example-form" role="form"> <div class="row"> <div class="col-lg-12"> <div class="input-group input-group-lg"> <span class="input-group-btn"> <button id="setValue" class="btn btn-default btn btn-danger" type="button"> 設置值: </button> </span> <input type="text" class="form-control" id="txtValue"> </div><!-- /input-group --> </div><!-- /.col-lg-6 --> </div> </form> </div> <div class="jumbotron"> <form class="bs-example bs-example-form" role="form"> <div class="row"> <div class="col-lg-12"> <div class="input-group input-group-lg"> <span class="input-group-btn"> <button class="btn btn-default btn-success" type="button" id="getValue"> 獲取值: </button> </span> <input type="text" id="spanValue" class="form-control"> </div><!-- /input-group --> </div><!-- /.col-lg-6 --> </div> </form> </div> <div class="row"> <div class="col-lg-12 "> <div id="msg" class="alert alert-danger"></div> </div> </div> <script> if (window.ethereum) { //連接到Metamask web3 = new Web3(ethereum); } else { ///直接連接到Ganache web3 = new Web3(new Web3.providers.HttpProvider("http://127.0.0.1:7545")); } //讀取合約的ABI信息 var data = $.ajax({ url: "./Storage.json", async: false }).responseText; //創建合約對象,使用的合約地址是我們剛創建的合約地址 var contract = new web3.eth.Contract(JSON.parse(data), '0xc8b522331e8A2369e87Cb4be6bE7C74Be86f1AAB'); $("#setValue").click(function () { try { ethereum.enable(); contract.methods.store($("#txtValue").val()).send({ from: '0x51BF497D8B47C5754220be9256F0Cb9E2Cd688B8' }); $("#msg").text("設置值成功!"); } catch (err) { $("#msg").text("設置值失敗:" + err.message); } }); $("#getValue").click(function () { contract.methods.retreive().call().then(function (result) { $("#spanValue").val(result); $("#msg").text("獲取值成功!"); }); }); </script></body></html>在瀏覽器中打開就能看到本文第一張圖的頁面了,分別點擊【設置值】和【獲取值】按鈕就能自由的和Storage合約交互了。OMG,驚不驚喜,意不意外,哈哈哈。